Connecting The Arduino IDE to Atmega32U4
With the Atmega board soldered to the pin headers, see Soldering Pin Headers to Atmega32U4, it was now time to attempt to program the board using the Arduino IDE.
With the IDE installed I connected a USB cable between my computer and the
Atmega board. I then tried to choose the board via the Select Board dropdown
in the IDE
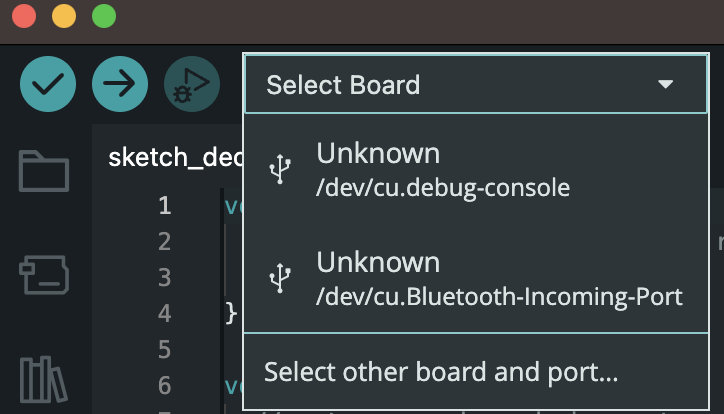
Unfortunately all that was shown was a debug console and some kind of bluetooth port. I started searching the internet for solutions. A number of search results suggested trying a different cable. I felt that this cable had served me well for connecting media players and other devices to my computer, but figured I’d grab another cable. The other cable had the same results. Some results mentioned that some cables are really only good for charging and not data connections, but as I mentioned I’ve used the first cable for data connections before so I know it’s good.
Doing some more searching I ran across someone mentioning that you may need an updated driver for M1 macs, link. However while looking into this driver and how to install it, I ran across other information that said the driver was no longer necessary for newer versions of the Arduino IDE, 2.0 and above.
After a while not feeling like I was progressing with internet searches, I realized I never fully verified the Atmega board I got would work with the Arduino IDE. I ended up running across the sparkfun website. Their Qwiic Pro Micro USB C board and Pro Micro boards looked similar to the ones I had, but not 100% the same.
After banging my head for a bit, I decided to take a step back. I had an Arduino Uno with a USB-A to USB-B cable that worked on a previous computer. I decided to get what I know would work going first and then come back and approach the Atmega board. Plugging in the Arduino Uno board with the supplied cable, plus a USB-C to USB-A adapter I was immediately greeted with a prompt asking to allow the connection.
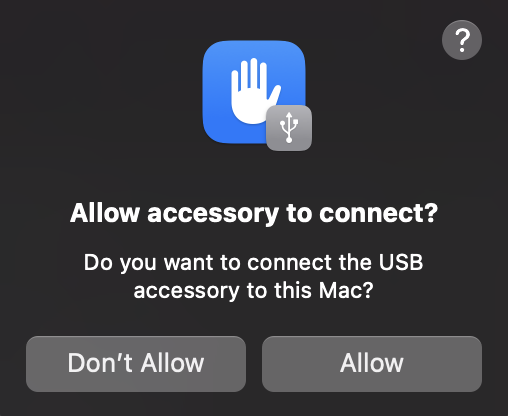
With this new found ability to connect the Arduino Uno to my machine I decided to revisit what I knew about my other working USB cables. I located a USB-A to USB-C cable attached it to the USB-C to USB-A adapter that was still in my computer, then attached the other end to the Atmega board. I was greeted with another prompt asking to allow the connection!!!
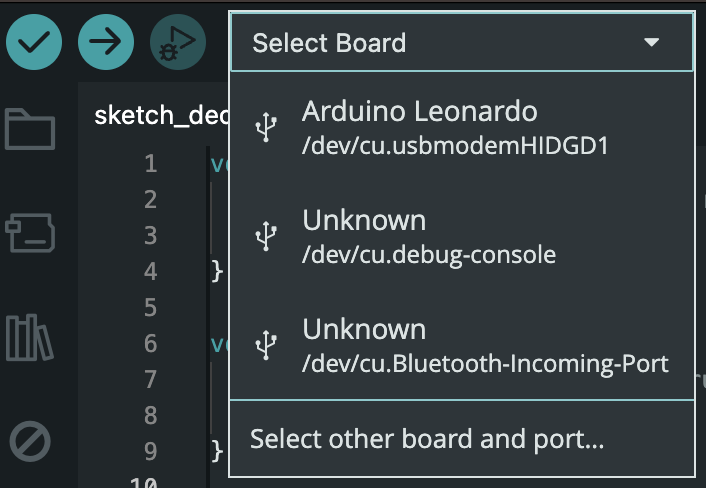
Going back to the Arduino IDE and the Select Board drop down I now had an
option for the “Arduino Leonardo”.
Doing a quick web search for the Leonardo, I found the Arduino docs saying:
The Leonardo differs from all preceding boards in that the ATmega32u4 has built-in USB communication
Given that it had the same chip and the IDE recognized the board as a Leonardo, I decided to select it and move forward to see what would happen.
Navigating to File->Examples->Basics->Blink, I chose the blink sketch and
uploaded it to the Atmega board. I could see the LEDs blinking on the board
during the upload, but once the upload was complete, the blinking stopped.
The code used a defined value, LED_BUILTIN
pinMode(LED_BUILTIN, OUTPUT);
Navigating to the definition of LED_BUILTIN landed me on this block of code:
#define LED_BUILTIN 13
#define LED_BUILTIN_RX 17
#define LED_BUILTIN_TX 30
Going back to the sparkfun site for their Pro micro, there was Example 1: Blinkies. The example used an LED with value 17.
int RXLED = 17; // The RX LED has a defined Arduino pin
Seeing that the sparkfun example used pin 17 for the RXLED and the Arduino
header files also had an RX LED that was on pin 17, I replaced all instances of
LED_BUILTIN in the Arduino blink sketch with LED_BUILTIN_RX. Uploading this
sketch to the Atmega board resulted in the RX LED blinking!!
I also tried the Blinkies example from sparkfun. It compiled, uploaded, and worked just fine from the Arduino IDE.
At this point a couple of things are clear:
- I don’t know USB cables
- The Arduino IDE should work for programming the Atmega board.
Language
It may be worth mentioning the decision to use the Arduino IDE, or at least the Arduino tools and the Arduino C like language.
There are a number of options available for developing on these kinds of embedded devices.
Elixir and Go are languages that I would love to have a reason to learn and use. However I must be practical. I’m proficient in C and am pretty sure I can handle the Arduino variant just fine. I will likely have enough learning challenges in this project that adding a new language may make it even more difficult for me to find the time to work on the project.