EX-G Hardware Switches Part 2
In the previous posts:
The code for the motion sensor and the scroll wheel were completed. From the software perspective, the only thing left is the mouse buttons.
In Using EX-G hardware switches, I ran into issues trying to use the hardware switches on the circuit board. With the motion sensor and scroll wheel working, I felt it was okay to go past the point of no return and modify the circuit board as necessary to be able to connect to the switches.
I wanted to remove the preexisting micro-controller. I lack the right tools for de-soldering. So I had to improvise.
I noticed that the controller is smaller than a staple. I was thinking that perhaps I could surround the contacts with a couple of staples bent to shape. Then use the soldering iron to heat up the staples, providing heat all the way around. The intent was to be able to have all solder joins liquid at the same time and be able to remove the micro controller.
The left image shows a standard staple next to the micro-controller. The right image shows my attempt at making a tool that would touch all contacts while being heated.

I don’t have a setup to be able to take pictures or video of this effort. Let’s just say it didn’t go well. I didn’t seem to get enough consistent heat to affect the solder connection. Multiple times I had a tiny hot wad of staples bouncing around when I moved wrong, causing me to resist every urge to reach out and catch it.
With that staple contraption not working, I decided to utilize my soldering iron directly. It has a small tip and I figured I could move it around the edges of the micro-controller to remove the solder connections. The results are shown below, it’s not pretty.
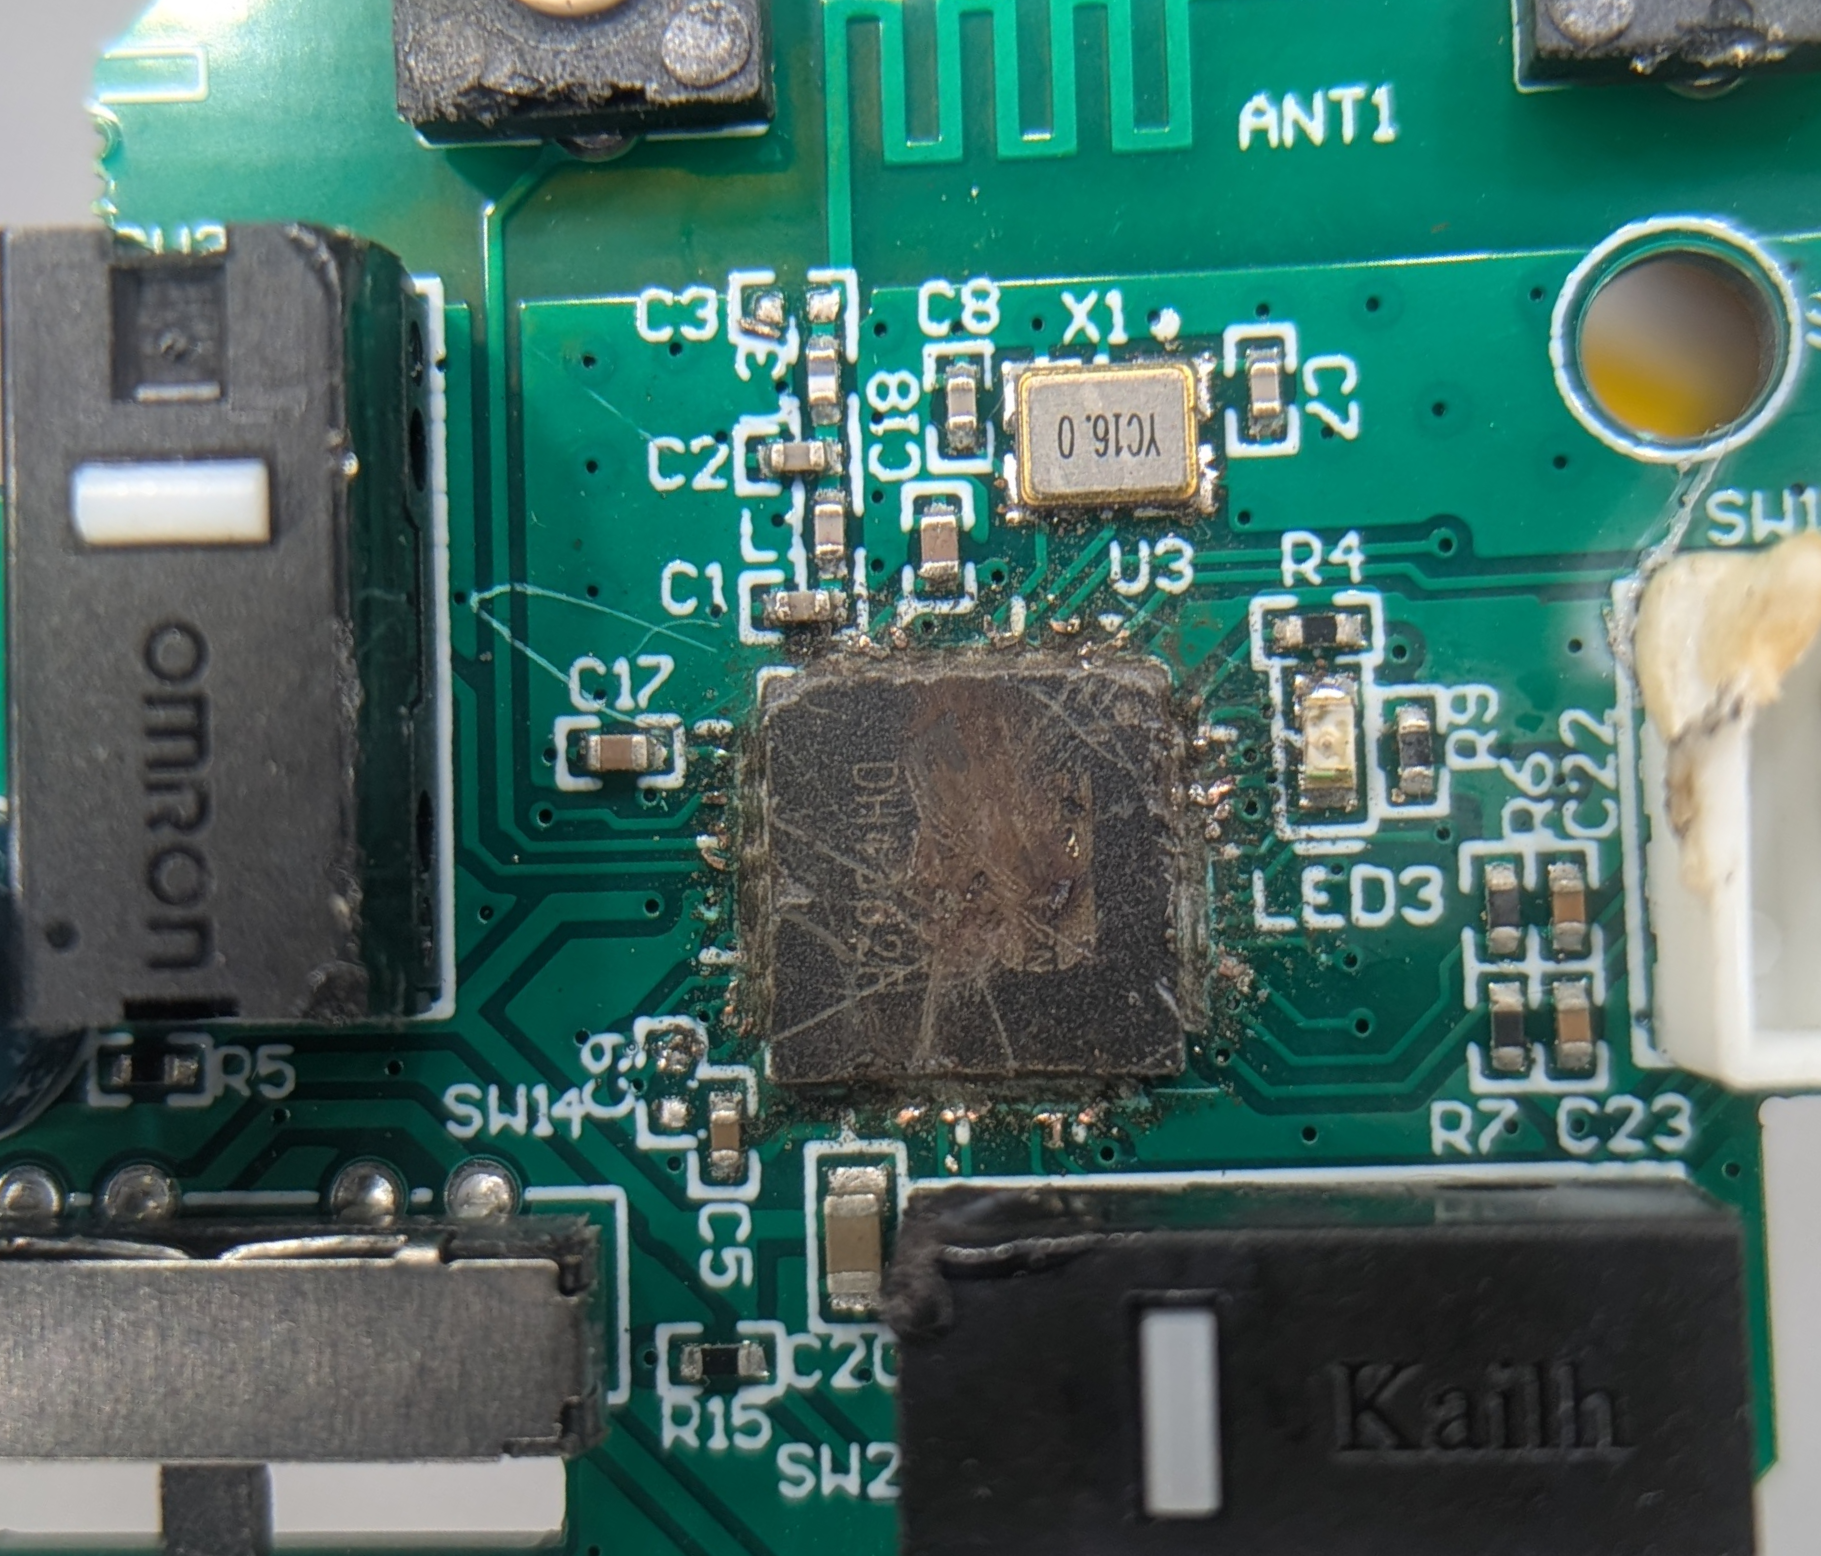
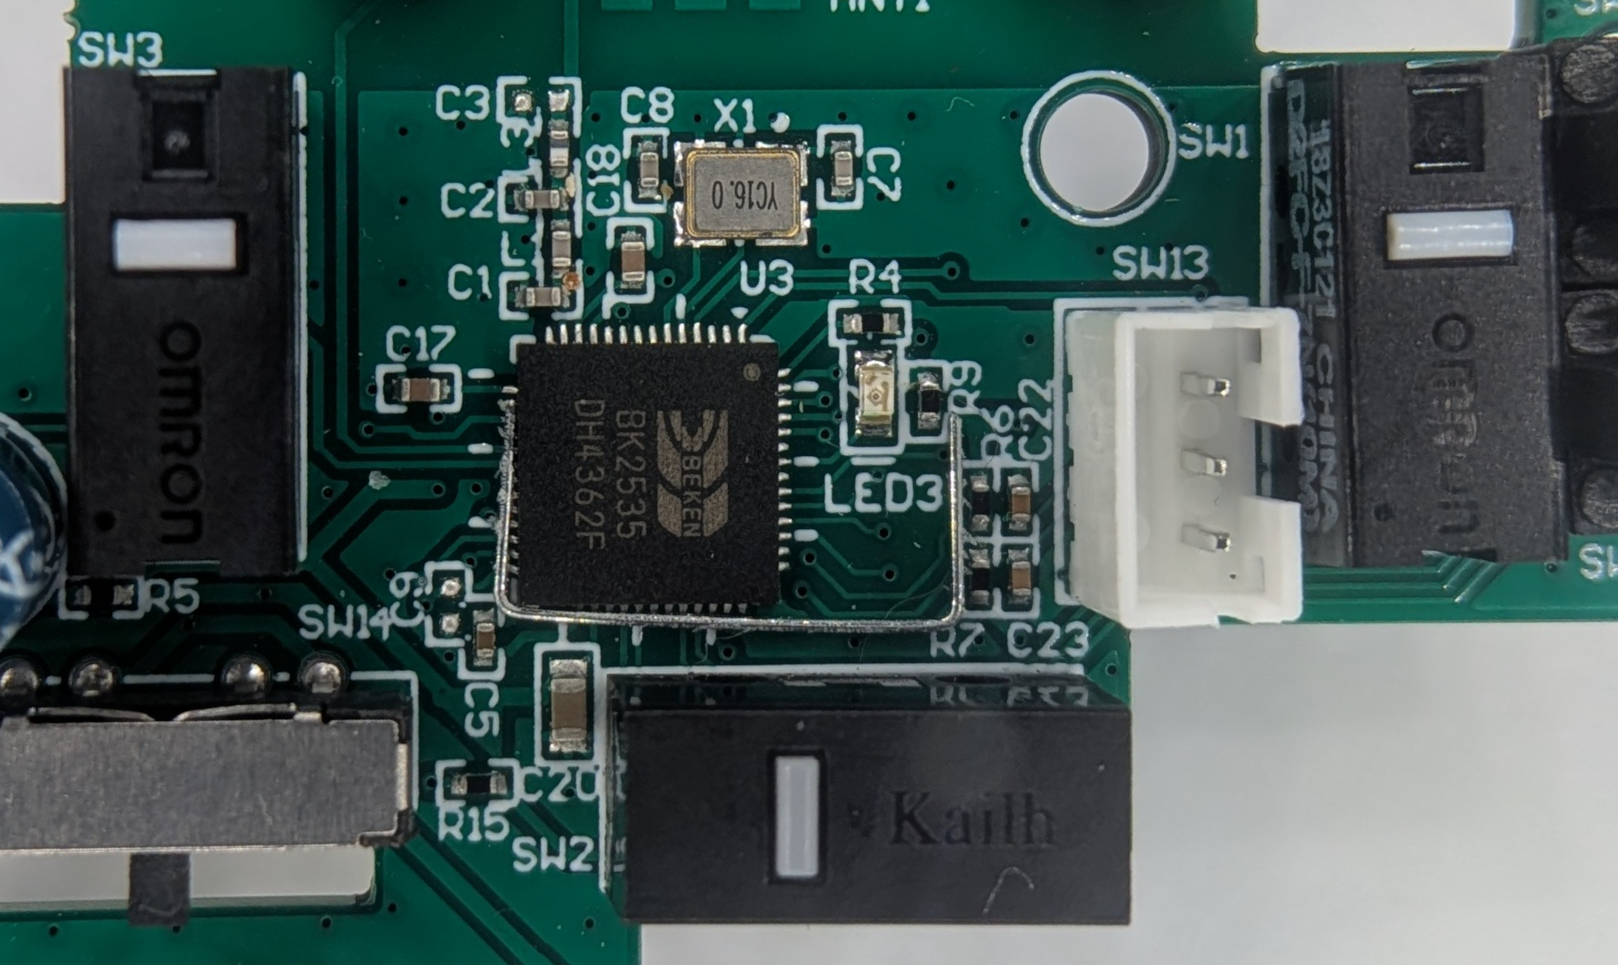
Some of the plastic on the switches and connectors has collateral damage from where I let the soldering iron move around too much. The board got scraped up in a few places. I’m pretty sure I melted into the top layer of the circuit board. The micro-controller is a bit scratched up as I was trying to pry it up with a small screwdriver. I think the micro-controller must be epoxied or glued to the circuit board, as it wouldn’t budge even after most of the solder connections were removed. I was able to test for continuity between the switches and the VDD point that was showing connection in Using EX-G hardware switches. The switches were now fully open and no longer passing current through the circuit board.
Switch Bouncing
In
Using Internal Pull-up Resistor of the Atmega
I ran into the issue of switch bouncing. When the switch is physically pressed
the physical characteristics may result in the switch seeming to be pressed and
released multiple times in the main sketch loop().
With the switches isolated on the circuit board, I wanted to find out if these switches had bounce and how long the bouncing occurred. I coded up a simple sketch to understand this behavior.
int oldLevel = HIGH;
void setup() {
  Serial.begin(115200);
  pinMode(D2, INPUT_PULLUP);
}
void loop() {
  int level = digitalRead(D2);
  if (level != oldLevel){
    oldLevel = level;
    unsigned long time = millis();
    Serial.print("Level: ");
    Serial.println(level);
    Serial.print("Time: ");
    Serial.println(time);
  }
}
The idea is to press a switch that is connected to the D2 pin of the ESP32S3
board. The code prints out the current millis() each time the pin changes
state. By holding the switch down long enough, it’s possible to know when the
time is part of the bouncing and when it’s the start of an intentional press or
release.
The first run of this code using the left click switch of the EX-G resulted in the following:
Level: 0
Time: 8206
Level: 1
Time: 8206
Level: 0
Time: 8206
Level: 1
Time: 8206
Level: 0
Time: 8206
Level: 1
Time: 8206
Level: 0
Time: 8206
Level: 1
Time: 8206
Level: 0
Time: 8207
Level: 1
Time: 8207
Level: 0
Time: 8207
Level: 1
Time: 8207
Level: 0
Time: 8207
Level: 1
Time: 14633
The first Level: 0 was the initial press. The subsequent transitions with
times 8206 to 8207 are the bounces. The level 1 time at 14633 is releasing the
switch.
I found it interesting that there was no bounce on release, only on press. The
printed lines with 8206 and 8207 values means that the bounces are occurring
across 1 ms. This data doesn’t indicate if this happened in few micro
seconds or if it was nearly the full 2 milliseconds. To get better precision,
the
millis()
call in the code was replaced with
micros().
This provided the following output:
Level: 0
Time: 8278934
Level: 1
Time: 8279044
Level: 0
Time: 8279138
Level: 1
Time: 8279214
Level: 0
Time: 8279309
Level: 1
Time: 8279417
Level: 0
Time: 8279494
Level: 1
Time: 8279557
Level: 0
Time: 8279633
Level: 1
Time: 8279725
Level: 0
Time: 8279800
Level: 1
Time: 8279890
Level: 0
Time: 8279957
Level: 1
Time: 10685728
The 10685728 time is releasing the switch. This leaves the times from 8278934 to 8279957, which is 1023 micro seconds. This means the bouncing lasted for just over 1 ms. This was only one sample. To get a good idea I sampled multiple times. Subsequent times were just under 1 ms. Performing the same operation on the right click switch gave similar results. The middle click button only bounced for 600 micro seconds. The switch looks the same physically, but the middle click switch is a different manufacturer, Kailh. The left and right click switches are Omron.
I decided to wait to see what options the library I used for debouncing provided before making a decision on the debounce time. I’m not sure how much these presses fully mimicked a standard press when the EX-G is assembled. It may be that there’s even more bounce. These debounce times give a minimum to use.
Debounce Library
Similar to EX-G Scroll Wheel Part 2, while I could implement debounce logic myself, there are many libraries available from the Arduino Library Manager. One that seemed to come up often on internet searches is Bounce2.
The Bounce2 library uses a millisecond resolution for the debounce window.
With the physical left and right switches bouncing for just over 1 ms, I decided
to use 2 ms as the debounce window. This gives me almost a double sized window.
Using a 1 ms may have resulted in registering errant switch releases.
The Bounce2 library provides
3 debounce algorithms.
I went with the
Prompt Detection
algorithm. My understanding is when it sees the first transition it will signal
a button press, then it will ignore bounces or transitions afterwards, for up to
the time specified. So for my use case it will trigger as soon as someone
presses the button and it won’t register a release for 2 ms after the initial
press.
Button.hpp
The code follows a similar model as that used for the motion sensor and the
scroll wheel. The constructor takes a pin to use. It initializes a
Bounce2::button() based on that pin and the EX-G hardware behavior. There is a
stateChange() function which returns a
std::optional. This
function is meant to be polled each loop iteration. If the button was pressed or
released since the last time stateChange() was called, an enumeration with the
new state is returned. If nothing has happened since the last time
stateChange() was called,
std::nullopt will
be returned.
#ifndef BUTTON_HPP
#define BUTTON_HPP

#include <optional>

#define BOUNCE_WITH_PROMPT_DETECTION
#include <Bounce2.h>

/**
 * @brief Represents the state of a button press event.
 */
enum class ButtonState {
  PRESSED, ///< Button was pressed down
  RELEASED ///< Button was released
};

/**
 * @brief Read button state changes with software debouncing
 *
 * Configured for active-low buttons with internal pull-up.
 */
class Button {
public:
  /**
   * @brief Construct a Button with the specified pin.
   *
   * Configures the pin as input with internal pull-up resistor and
   * sets a 2ms debounce interval.
   *
   * @param pin The GPIO pin connected to the button
   */
  Button(uint8_t pin) : _button(), _pressed(false) {
    _button.attach(pin, INPUT_PULLUP);
    // From testing the left and right click of the ex-g were a little over
    // 1 ms bouncing. The middle click was closer to 600 us for bouncing
    _button.interval(2);
    _button.setPressedState(LOW);
  }

  /**
   * @brief Poll the button and return the new state if it changed.
   *
   * Must be called regularly (e.g., in loop()) to detect state changes.
   *
   * @return ButtonState::PRESSED or ButtonState::RELEASED if the state
   *         changed since the last call, std::nullopt otherwise.
   */
  std::optional<ButtonState> stateChange() {
    _button.update();
    bool newPressedState = _button.pressed();
    if (_pressed != newPressedState) {
      _pressed = newPressedState;
      return _pressed ? ButtonState::PRESSED : ButtonState::RELEASED;
    }
    return std::nullopt;
  }

private:
  Bounce2::Button _button;
  bool _pressed;
};

#endif // BUTTON_HPP
Connecting this back to the main sketch file, ex-g.ino, was a bit more work
than it was for the motion sensor and scroll wheel. The reason for this is
that there are three buttons.
I created two arrays, one for holding the Button objects and another for
holding which Mouse specific enum they’re associated with.
As I write this post, I realize it should probably be a struct in
ex-g.inothat contains aButtonand theMouseenum instead of two parallel arrays.
The main loop() of the sketch iterates over each Button and sees if its
state has changed. If the state has changed, it calls the appropriate Mouse
function based on what the state changed to.
  for (size_t i = 0; i < std::size(buttons); i++) {
    auto state = buttons[i]->stateChange();
    if (state) {
      if (*state == ButtonState::PRESSED) {
        Mouse.press(mouseButtons[i]);
      } else {
        Mouse.release(mouseButtons[i]);
      }
    }
  }
Full ex-g.ino code
#include "Button.hpp"
#include "MotionSensor.hpp"
#include "ScrollWheel.hpp"
#include <USB.h>
#include <USBHIDMouse.h>
#include <optional>

USBHIDMouse Mouse;
std::optional<MotionSensor> sensor;
std::optional<ScrollWheel> scrollWheel;
std::optional<Button> buttons[3];
const uint8_t mouseButtons[] = {MOUSE_LEFT, MOUSE_RIGHT, MOUSE_MIDDLE};
static_assert(sizeof(buttons) / sizeof(buttons[0]) ==
                  sizeof(mouseButtons) / sizeof(mouseButtons[0]),
              "buttons and mouseButtons arrays must have the same count");

/**
 * @brief Called once at program startup to perform initialization.
 *
 * Place any hardware or application initialization code here; this function
 * is invoked once before the main execution loop begins.
 */
void setup() {
  Mouse.begin();
  USB.begin();
  // D8, D9, D10 are SPI pins
  sensor.emplace(D7, 1500);
  scrollWheel.emplace(D0, D1);
  buttons[0].emplace(D2);
  buttons[1].emplace(D3);
  buttons[2].emplace(D4);
}

/**
 * @brief Executes repeatedly after setup to perform the sketch's main logic.
 *
 * This function is invoked in a continuous loop by the Arduino runtime; place
 * recurring or periodic code here. Currently the implementation is empty.
 */
void loop() {
  auto motion = sensor->motion();
  auto scroll = scrollWheel->delta();
  if (motion || scroll) {
    auto m = motion.value_or(Motion{0, 0});
    Mouse.move(m.delta_x, m.delta_y, scroll.value_or(0));
  }

  for (size_t i = 0; i < std::size(buttons); i++) {
    auto state = buttons[i]->stateChange();
    if (state) {
      if (*state == ButtonState::PRESSED) {
        Mouse.press(mouseButtons[i]);
      } else {
        Mouse.release(mouseButtons[i]);
      }
    }
  }
}
Testing Out The Code
I compiled and uploaded the sketch. Unplugged the ESP32S3 and plugged it back in. Then I attempted to left click. It clicked and released just fine. Trying to hold and drag didn’t work. When trying to hold it would just click.
It didn’t take too long to figure out that I was using the wrong function from
Bounce2. The code was using pressed(). The documentation says:
Returns true if the button was pressed
With emphasis on was. There is another function isPressed() which says:
Returns true if the button is currently pressed.
Replacing pressed() with isPressed() resulted in the hold and drag working.
After making these corrections, I looked at my initial push of the code to Github and I see this nice review comment from coderabbit.ai:
Use isPressed() instead of pressed() — current code causes spurious state changes.
pressed() is edge-triggered and returns true only on the transition to the pressed state, …
Realizing that the stateChange() function only returns on a change and
the Bounce2 library has pressed() and released() that only return on state
change, I decided to further refactor the logic away from isPressed(), which
required storing the current button pressed state:
  std::optional<ButtonState> stateChange() {
    _button.update();
    if (_button.pressed()) {
      return ButtonState::PRESSED;
    }
    if (_button.released()) {
      return ButtonState::RELEASED;
    }
    return std::nullopt;
  }
Summary
It seems that most of the code is now written for Converting a Wireless Trackball to Wired project. The next steps are:
- Permanently wire the ESP32S3 to the EX-G circuit boards.
- Figure out how to route the USB cable to the ESP32S3 inside the EX-G case.